Pages

Showing posts with label recipe. Show all posts

Monday, May 18, 2015

Recipe: Cocoa Power Protein Donuts (Gluten-free and Vegan)

I have this rule about donuts:

I refuse to buy a donut for myself. If I opened that door, it would never close again, because I love the fluffy little sugar monsters. Not for me, the bacon donuts and the donuts covered in cereal. Give me a plain glazed or dense old-fashionedd cake donut any day. Per the rule, I will only eat such donuts if they are provided by someone else.


I was going to take a picture
of this donut. Then I ate
most of it.
However, power donuts have won a place in my diet. These are yummy little snacks baked in a donut pan and filled with good things like chia seeds and oats. Flavored with maple syrup and cinnamon, they aren't super-sweet, but they are tasty.

The regular recipe I use -- from the Oh She Glows cookbook -- isn't exactly a kids' dream, though, and while I've been staying with my family, I wanted to create a protein donut that my nephew might like as a snack. I combined my favorite flavors -- peanut butter, banana, and chocolate -- to make a donut that is still filling and crammed with goodness, but a bit more kid-friendly.

And of course, I like them too!

A few notes:
Here's what the oat flour will look like.
  • The recipe calls for rolled oats, which are naturally gluten-free. Some brands may have some cross contamination from processing, so if you're avoiding gluten, make sure that you get one labeled gluten-free. Bob's Red Mill has a brand that is readily available. In fact, I usually buy it, although I'm not watching gluten, because it's so easy to find.
  • In this recipe, you're going to process those rolled oats into flour. It's really cool to be able to say, hey, I made this flour myself.  If you don't have a food processor or strong blender, you can just purchase oat flour instead. 
  • If you're vegan, either be sure that you have vegan chocolate chips or skip them altogether.
  • This recipe uses a donut pan, which is about $13 at Target. It's been a great investment - I use mine every week.

Cocoa Power Protein Donuts

Ingredients:

1 c. rolled oats
1/4 c. chia seeds (or, for funsies, 1/8 c. chia seeds and 1/8 c. raw millet, which adds more crunch)
2 tbsp. cocoa powder
1.5 tsp. cinnamon
1/2 banana
2 tbsp. peanut butter
1/2 tsp. vanilla
2 tbsp. maple syrup
1/4 c. almond or other non-dairy milk, plus more as needed
Mini-chocolate chips

Step 1: Pre-heat the oven to 300 degrees, and grease the donut pan.

This guy is a hot miller.
Just like you!
Photo: dailyfinance.com
Step 2: Put the oats in the food processor and process until they are the consistency of flour. You just made flour! You're like a miller, or something!

Step 3: In a bowl, mix together the dry ingredients, stirring with a fork to ensure that the chia seeds are integrated throughout and any lumps of baking soda are broken up.

Step 4: In another bowl, mash the banana. Mix this with the peanut butter, then add the other wet ingredients and whisk together until incorporated.
Donut pan

Step 5: Add the wet ingredients to the dry, and stir. The consistency should be close to that of creamy peanut butter. If it's not, add small amounts of the non-dairy milk, stirring after each addition, until that consistency is reached.

Step 6: Put about a teaspoon of the chocolate chips in each well of the donut pan, spreading them out so that they are evenly distributed around each ring. Spoon the dough into each well of the pan, smoothing it out on top.

Step 7: Bake for 23 minutes. When you pull them out of the oven, let them cool for a few minutes and then turn them out onto a wire rack.


Note: Want to make a version that's just chocolate peanut-butter, with no banana? Increase the amounts of both cocoa and peanut butter to 1/4 cup, and keep the rest of the recipe the same. You will definitely need a little extra almond milk.


Sunday, September 7, 2014

Recipe: Overnight Oats, 2 Ways


I think I've mentioned before, I'm a super-cool urban hipster who is always up on the latest trends.

Oh, wait, what was that? You're snickering at me?

OK, fine. If you don't believe me, check out this lunch I recently packed for myself:

Why, yes, that IS a green smoothie in my lunch.

See, that's THREE Mason jars in one lunch. Other hipsters tip their waxed moustaches at me (yes, I spelled it the French way!) when they see that.

One trend that I've been enjoying recently is the rise of overnight oats. This is oatmeal that you don't have to cook; it's vegan-friendly (I'm not a vegan or even a vegetarian, but sometimes I play one on TV) and it tastes delicious ... if you are someone who likes things that are the consistency of rice pudding. I say this, because there's a large segment of the population that doesn't like pudding-type things with chunky bits. However, if you LOVE rice pudding or other types of chunky pudding (tapioca, bread), then you will like this a lot.

There are a lot of overnight oats recipes out there, from simple to complex. The basic principles are these: You put 1 part oats to 1 part liquid (I like almond milk) and an optional 1/3 part chia seeds in a container and put it in the fridge overnight. The oats and chia seeds soak up the liquid, and become a kind of pudding.

PUDDING FOR BREAKFAST!! And it's pudding that's ready the moment you wake up!

Make it in a funky jar for extra street cred -
if the street is in Portland and is lined with artisan barrel makers
and food trucks selling Korean-Finnish fusion food (kimchi herring - yum!). 

In experimenting with overnight oats, I've come up with two variations that are my favorites. 

The first is Cherry Vanilla Almond. I am a huge fan of dried cherries, particularly of the sour variety.

The second variation I've dubbed "Funky Monkey." The first time I ever had a smoothie, it was at a little shop in Santa Barbara, and the drink I had was called the Funky Monkey - peanut butter, chocolate, and banana (hence the monkey).  I've named my concoction after this perfect combination of elements.

Here are the easy-peasy recipes.

Cherry Vanilla Almond Overnight Oats

Ingredients (per serving)

1/3 cup rolled or steel-cut oats (steel-cut make a chewier texture)
1/3 cup vanilla almond milk
about 1/8 cup chia seeds
1/3-1/2 banana, mashed (optional)
a dash of cinnamon
a handful of dried sour cherries

Mix all the ingredients in a container (or Mason jar!), making sure to incorporate the banana well. Cover and put in the refrigerator overnight.

When you take it out of the refrigerator, it will look pretty firm and the chia seeds may be resting on top. Add a splash of the almond milk and stir. Garnish with your favorite fresh berries or sliced almonds (blueberries are especially delicious).

Funky Monkey Overnight Oats

Ingredients (per serving)

1-2 tablespoons peanut butter (I find 1.5 to be the sweet spot)
1 tablespoon cocoa powder
1/3-1/2 banana, mashed
1/3 cup vanilla almond milk
1/3 cup rolled or steel-cut oats
1/8ish cup chia seeds
a squirt of honey or other sweetener, if you want (I don't like very sweet things, so I often omit this, but the pudding isn't very sweet without it - especially if you're making this for a kid, I would add it, at least until you have them hooked)

Whisk together the peanut butter, cocoa, banana, and almond milk until well incorporated. Then mix in the other ingredients. Cover and refrigerate overnight. Splash with almond milk and stir to serve. 

Thursday, March 20, 2014

Recipe: Shamrock Shimmy Smoothie

Mid-morning snack attack at work!
Shamrock shimmy smoothie!
Anyone who knows me, knows that I'm always ahead of the trends.

Exhibit A: Before most people had heard of Nirvana, I had already decided I didn't like them. Billy Joel, people. That's where it's at.


Exhibit B: Prior to "boho chic" being a major trend, I was sporting hippie threads that I dug out of the drama closet at summer camp.

Exhibit C: Prior to knitting becoming a trend, I taught myself knitting from a kit called "I Taught Myself Knitting!"

(Hmm... I'm beginning to realize I may not be as cool as I thought...)

One trend that I just haven't been able to get behind, though, is KALE. Seriously. Why would I want a salad that's made out of wadded up paper towels? My nightmare is being forced to eat a kale quinoa salad at a pop-up restaurant while watching Girls and listening to EDM. I imagine that in ten years, people are going to wake up and be all: why did I eat that? And why did we think that stuff was cool?

Even more baffling to me: putting KALE in a smoothie. A smoothie is supposed to be a bait-and-switch so that you can drink milkshakes and feel healthy about it. Peanut butter, banana, Hershey's. That's a smoothie.

Do you sense that I'm about to eat my words?

I still don't want a kale salad or a big plate of kale or a kale cupcake. My mom got me the Oh She Glows cookbook for my birthday, though, and it has several recipes for green smoothies in it.  Oh She Glows is a blog of vegan, whole foods recipes (when you Google it, the first search that comes up is "Oh She Glows kale salad"). The blog and the cookbook are great because lot of vegan recipes are heavy on soy products and processed fake-meat-like foods, which I try to avoid, particularly because it's the "Year of More" and that means more whole foods

For some reason, I thought I'd give green smoothies a try after every blogger in the world had already decided they were God's gifts to moms who give their kids cute nicknames on the internet. Guess what? 

Reader, I loved it.

So let's come around to the recipe, shall we?

A few days after this revelation, I was cruising on that great recipe-box-in-the-cloud, Pinterest, and there was a recipe for "healthy Shamrock shake - with mint!" I have never had a Shamrock shake, but that sounded pretty good.

For some reason, I pictured "mint" as being, you know ... mint. Like leaves, and stuff. I always forget that a lot of people don't eat natural things. The recipe was made with milk (I'm cutting way back on dairy), chocolate chips (didn't have those), and peppermint extract. Since I have a bunch of mint growing in my garden, I decided that I could make a "Shamrock" smoothie that would actually be healthy.

Below is the recipe my first stab at making my own green smoothie. I think it is SO delicious. At least to me, and I'm the one drinking it. 

A few notes:

  • I've made it with both baby kale and baby spinach, but if you're making it for kids and you want them to forget there are greens involved, I'd go with the spinach.
  • I used honey in this recipe, but if you want it to be completely vegan, then substitute a plant-based sweetener.
  • This is not a cute color.
Shamrock Shimmy Smoothie

Ingredients
1 c. non-dairy milk (I like hemp milk)
3/4-1 c. baby kale or baby spinach, de-stemmed and torn
1 banana, sliced and frozen
6-10 fresh mint leaves
1 tbsp. unsweetened cocoa powder
2 tsp. honey

Step 1) put everything in a blender and blend it and drink it. 


Thursday, January 30, 2014

Recipe: Thai-inspired Coconut Curry Soup

The soup at the end of the story.
Tuesday, I hopped on a plane with seven co-workers, heading to Birmingham, AL for a conference. As we began our descent into Bham, the pilot announced that the airport was closed due to ice and snow. We would be able to land as soon as they cleared the runways.

We were diverted to Nashville, where we spent the day waiting for updates about those runways. As we sat in the airport, much of the South was plunged into a state of emergency, with people abandoning their cars on the side of the road, kids sheltering at school overnight, and people sleeping in Publix. Houston's strategy under even a threat of ice is to close the schools and a lot of businesses pre-emptively, People make fun of us for it, but as a Northerner who now lives in Texas, even a wee bit of ice is no joke in the South. There are no plows, no sand trucks, no studded tires. It's best to keep as many people off the roads as possible. The fact that some cities didn't is partly why there was such a problem on Tuesday.
Here we are - we made it home!
(That's me, second from right)


We were pretty lucky in that we were safe and warm in the airport, and by evening our flight was finally canceled. Nashville was chilly but there was no severe ice or snow, and the airline gave us a discount on a hotel. With Birmingham airport remaining closed, we turned around and headed home.

What does this have to do with food? you might ask.
I'm like Ponyo when I see a bowl of noodles.


Well, two days in an airport leaves one feeling kind of funky. On the way home, I began thinking about what I could cook up that would be warm, comforting, and healthful. Of course, I landed on the idea of chicken soup... but not just any chicken soup. Since making chicken pho from Smitten Kitchen last week, I'm sort of obsessed with warm, slurpy bowls of noodly goodness (well, truth be told, I'm always kind of obsessed with this, as any fan of Miyazaki should be).

I learned some new techniques from the chicken pho - namely, how to make a good chicken broth - so I decided to use those to make tom ka gai, which is a Thai version of chicken soup. On the way home, from the airport I stopped at the store for ingredients, and by that evening I was slurping away.

Tom Ka Gai (Coconut Curry Soup)

For the broth:

3 1" x 1/2" pieces of ginger, peeled
2 Thai chilies, halved and seeded
1 lime, quartered
1 onion, peeled and quartered
4-6 bone in, skin on chicken thighs or drumsticks

Add all ingredients to a soup pot and add 6 cups of water, or just enough to cover. Bring to a boil, and lower heat to simmer. Simmer 30 minutes or until chicken is cooked through. Remove chicken from the pot. 


Remove the chicken meat from the bone and set aside. Return the bones and skin to the pot and continue simmering for 20-30 minutes.

Remove the broth from heat, and strain, discarding all the solids.

While the broth is simmering, prep:

1 red pepper, sliced thin
1 shallot, sliced thin
1 package of dried wild mushrooms. Pour boiling water over them to cover and let sit for 20 minutes, then slice thin (you could also use sliced fresh mushrooms)
1 package of thick rice noodles (pad thai noodles or rice sticks) - prepare according package directions

To finish the soup:

Return the broth to heat, and whisk in:

2 cans of coconut milk or lite coconut milk
3 tbsp. Thai red curry paste
1 tbsp fish sauce (if you can't find fish sauce, add a tsp. of salt)
a squeeze of Sriracha (Thai hot sauce - optional)
1 tbsp. brown sugar
the juice of 1-2 limes
pinch of black pepper

Let simmer for 5-10 minutes.

Add the chicken, red pepper, mushrooms, and shallots and continue to simmer until the chicken and veg are heated through.


To serve:

Put some of the noodles in a deep bowl, and ladle the soup over them. To garnish, add chopped cilantro, basil, scallions, and a wedge or two of lime.

Note:
If you have left overs, refrigerate the noodles and the soup separately so the noodles don't break down in the liquid. The coconut milk may separate somewhat in the fridge, but just heat it up and give it a stir!


Wednesday, January 8, 2014

Recipe: Breakfast Brown Rice with Fruit and Nuts

At your work, do you always start meetings with "whip-arounds?" Probably not.

 If you've never heard of a whip-around (I know, the name is vaguely S&M), it's where someone asks a get-to-know-you type question and then the question "whips" around the table, answered by each person in turn. It's kind of like an ice breaker, except everyone knows each other already, so the ice is long since melted. 

Of course, many of this week's whip-arounds have been about New Year's Resolutions. So when I said that eating "more whole foods" was one of my goals, many "who's-on-first?"ish conversations ensued, when folks thought I said I'd eat "at Whole Foods" instead of  "eat whole foods."

(I'm sure that you've by now developed a mental image of the type of workplace I inhabit. Yes, we are a bunch of lovable nerds.)
THIS.......................................................NOT THIS


Anyhoos, one way to incorporate more whole foods is by bringing them into breakfast. I've never been a fan of brown rice, but cooked with spices, it makes a great hot breakfast cereal.

You can cook the rice on the weekend, refrigerate it, and then serve it up throughout the week.

Many people say they "can't" cook rice, so the idea of cooking up a pot and banking your future breakfasts on it might feel a little daunting.  A few tips:

  • I always set a timer for a few minutes less than recommended. 
  • When you put the pot lid on, very slowly bring the stove top temperature down to low. If you do it too quickly, the water can stop simmering.
  • When the timer goes off, slowly lift the lid of the pot, and see - does the rice have a flat surface with several holes in it? If yes, push some of the rice to the side and see if there is water on the bottom of the pot, underneath the rice. If there is, it's not done. Give it a few more minutes. Keep an eye on it so it doesn't burn.
  •  If some rice burns and sticks to the bottom, don't try to scrape it up and serve it. Just let it die. Gently fluff the rice on top with a fork so you don't get the burned pieces.
I usually get nice fluffy rice when I follow these tips.

Breakfast Brown Rice

Ingredients for the brown rice:
2 tsp. olive oil
1 c. brown rice
1 tsp. cinnamon
1/2 tsp. cardamom or nutmeg
1/4 tsp. ground cloves
2 c. water

To serve:
1/3 c. vanilla soy, hemp, or almond milk or 1/3 c. skim milk
your favorite dried fruits or berries (like apricots, cherries, raisins, or blueberries)
slivered toasted almonds or other nuts that you like

To make rice:
Heat the oil in a pot over medium-high heat. Pour in the rice, and the spices, and stir. Cook, stirring, until the grains begin to become opaque and the spices are fragrant - 2-3 minutes. Pour in the water and stir once or twice. Heat water until boiling, then put the lid on the pot and gently lower temperature. Cook for 38-40 minutes before checking for doneness.

If you're not serving right away, refrigerate rice.

To serve:
Put about 2/3 c. of the cooked rice into a bowl and pour in the milk or milk-like beverage. Add the dried fruits. If the rice is coming out of the fridge, microwave for about 1 min. 30 sec. Sprinkle on the nuts after heating.

Sunday, August 4, 2013

Recipe: Seared Scallop and Summer Fruit Salad with Lemon Prosecco Vinaigrette


If you are standing at the fish counter, you might get scared by the price of scallops, especially the gigantic sea scallops. And you might think to yourself: I've heard scallops are easy to ruin. I'm not going to buy something expensive that I will ruin and end up eating drive-thru food because I spoiled dinner.

Good point. But once in awhile, it's good to take a chance. And scallops are actually easy to cook, as long as you pay attention.

They are expensive, however, so I usually only buy them a couple of times a year. When I do, I want to pair them with delicious ingredients that won't overwhelm their delicate flavor. A few years ago, I tried a recipe that paired scallops with watermelon, and since then, I've been hooked on this combination. 

Yesterday, I bought some scallops and watermelon, and came up with this recipe using some things I had in my refrigerator. This salad uses seasonal fruits - I used watermelon and blueberries, but you could use others as well. I wanted to add nectarine, but it wasn't quite ripe. This dish would make a good special occasion meal, because it's pretty, and every bite is different, depending upon what you have on your fork: spicy arugula, tangy goat cheese, sweet berries and melon, zesty basil. 

So... about those scallops. How do you ensure success?        


First,  for this recipe, you want to buy sea scallops. Most scallops are rated either "Best Choice" or "Good Alternative" by Monterey Bay Aquarium's Seafood Watch. This means that you can feel pretty good about most of the ones that you pick up (the only ones that aren't rated good are actually not scallops at all, but skates, which are sometimes cut up and sold as bay scallops). Sea scallops are the big ones; bay scallops are little and are better for recipes where they don't stand alone, such as pastas. Depending upon the size, each person should get 3-5.

Make sure that your "fishmonger" (that guy at the fish counter) gives you fresh scallops - they should be sort of pinkish and smell clean. If you live far from the ocean, lots of people recommend flash frozen scallops instead of fresh.

When you are ready to cook the scallops, rinse them off and pat them dry, then sprinkle on a little salt. Heat some oil or butter in a skillet over high heat. You want the oil to be very hot, smoking a little. Then put the scallops in the pan, without crowding them. Don't move them. Just let them sit for 1 1/2 to 2 minutes. Keep an eye on them, watching the side of the scallop. You'll see that the cooked part turns opaque - turn them over just before that opacity hits the mid-point of the scallop. Then let the other side cook for 1 1/2 to 2 minutes. When you see that only the very mid-point is still translucent, remove from heat and serve right away. The middle might retain some translucency, but remember that the scallop will keep cooking after you take it from the heat. 

If you're nervous, you might want to try with a practice scallop before you sear the whole batch. However, you'll probably find out that it is easier than you think to sear scallops just like in a restaurant.

Recipe: Seared Scallop and Summer Fruit Salad with Lemon Prosecco Vinaigrette

Step One: Salad 
Ingredients per serving:
a handful of baby arugula
3-4 basil leaves, chopped finely
1/4 cucumber, cut into spears
1/4-1/2 watermelon, seeded and cubed into 1 inch pieces
1/4-1/2 cup blueberries or other ripe fruit
1 oz. goat cheese, crumbled

Mix all of the salad ingredients and arrange in the center of the plate.

Step Two: Dressing
Ingredients: (serves 4-6)
Juice of 1 lemon
1 tbsp olive oil
2 tbsp prosecco or other sparkling wine
approx. 1/2 tsp. black pepper
Splash red wine vinegar

Using a fork or whisk, mix the ingredients for the dressing.

Step Three: Scallops
Ingredients: 
3-5 scallops per person, depending on size
sea salt

Following the instructions above, sear the scallops. Arrange them around the salad and drizzle the salad with 1-2 tsps. of dressing. Serve immediately.


Saturday, July 20, 2013

Recipe: Easy Saffron Rice

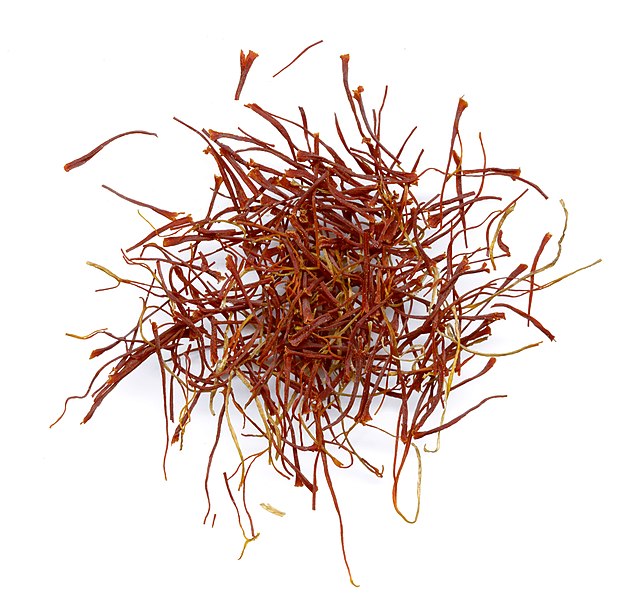
Saffron threads.
Photo courtesy: Zenz, Wikimedia Commons
There's been so much news going on lately, I've been having trouble processing all of my thoughts. I've started blog posts on serious topics, but haven't gotten through them.

So I thought I would just write something simple, that isn't fraught with conflicting emotions.

A friend asked for my recipe for saffron rice, so I thought I'd share it with all of you. This is a easy side dish, and a nice change from regular rice. It has a mild, somewhat sweet flavor, and is a good accompaniment for chicken or fish. (It's also great with some chopped avocado or tomato)


 Saffron is a spice made from the stigmas of a certain type of crocus, and if you look for it in the store, you might be shocked by the price tag. However, you only use a tiny bit at any given time, so a bottle will last quite a while.

So here it is:

Easy Saffron Rice

Ingredients:
1 tsp. of olive oil or a couple of sprays of olive oil
1/2 yellow onion, chopped
2-3 cloves of garlic, minced or crushed in garlic press
1 c. of rice
5-10 threads of saffron
turmeric
salt
2 c. water or vegetable broth

Step One: In a sauce pan over medium-high heat, heat the oil. Add the onion and garlic and saute until translucent.

Step Two: Add the rice and saute for 1-2 minutes until it begins to be slightly translucent.

Step Three: Add saffron, and a good shake of turmeric and salt. Stir. Then add the liquid and stir. Bring to a boil. Cover and lower heat, and cook according to package directions on rice.

Thursday, June 27, 2013

Waste Not...Freezing Fresh Herbs

After living on the farm for awhile, I've come to realize that I'm not exactly Ms. Green Thumb. I'm also not a black thumb. My thumb is probably more of a chamo brown. 

I have been successful growing herbs, however, and it is nice that I don't have to worry about buying mint or rosemary or basil. When my cilantro bolted (produced flowers, which takes away resources from the leaves, which means that the herbs aren't so nice anymore) I didn't know what to do with all of the extra cilantro, so it went to waste.

When my dill plant bolted, I was ready. I remembered that I had seen an article once on freezing herbs in blocks of ice, and so I did some research and figured out how to preserve herbs. You don't have to be a horticulturist to use this technique - think of all those herbs that come in giant bunches from the grocery store. I was always buying them and then finding it  hard to use the bunch before the herbs turned into a slimy mess. If you follow this method, you can preserve them, saving money, trips to the store, and resources.

Step One: Wash and dry the herbs. This is the dill from my garden. Notice it was a little yellow in places because I harvested it after it bolted, but I just cut those parts out in Step 2.


Step 2: When the herbs are completely dry, chop them to the size you usually use in cooking.

Step 3: Measure the herbs, putting the same amount in each pocket of an ice cube tray, and fill with water. I put a teaspoon in each square. That way, I'll know exactly how much to thaw when I need it. You want to be sure that you put the faucet on just a little when you fill with water. Otherwise the herbs could be splashed from the tray.


Step 4: Freeze, making sure the tray is flat in the freezer.


Step 5: When they are frozen, put them in a freezer bag, squeezing out all the air. Label with the name of the herb and the amount in each cube.

When you're ready to use, just put the appropriate number of cubes in a small bowl to thaw, then squeeze out the water and dry.

Monday, June 17, 2013

Haters Gonna Hate, But Gwyneth Doesn't Care

I know.

I know.

You don't like Gwyneth. You hate Gwyneth.

Lots of people can't stand her. Apparently, it's such a common thing that Buzzfeed recently had a feature of "22 Pictures that may just cause you to like Gwyneth Paltrow again."

If you're one of those people, I think you should change your mind. At least, change your mind about her cooking.

I recently picked up her cookbook It's All Good, and I have to say, it's quickly becoming my favorite kitchen companion.

The theme of the cookbook is simple cooking that is good for you - hence the title. The story behind it is that Gwyneth felt really gross and thought she was going to die one day, but it turned out she was having a migraine and a panic attack. So a doctor basically told her to cut everything fun out of her diet - including deep water fish. Never heard that one before; I guess it has something to do with mercury. Then she found out her family is basically sensitive to gluten and cow's milk and angels and kittens and rainbows (hmm... maybe that is why people don't like her).

All of the recipes in this cookbook are labeled according to the kind of diet you might be on - elimination, vegan, protein-packed, etc. This sounds like it might be a huge bummer, but it totally isn't. So far, everything I've cooked has been full of flavor, filling, and pretty to look at. 

I especially like this book because it is perfect for someone like me, who doesn't eat mammals. There are only a couple of meat recipes; the non-veg recipes are mostly chicken and fish. I've made Gwyneth's Spanish-style barbecue chicken, the roast chicken, and Tandoori turkey kebabs. Every one was delicious.

I will say that most of the cooking times haven't been accurate for me, but I think it's mostly my stove.  Nevertheless, I'd make sure you're using a meat thermometer if you're cooking any of the chicken dishes.

And I'll admit it, I kind of like the pictures of Gwyneth lounging around her farm. I'm pretty sure her life is just like mine... right?

Saturday, May 18, 2013

Recipe: Homemade Refried Beans

... And now for something completely different.

So, it's a little heavy around here, right? What with the activism and the inspiration and the visits to prison?

Here's some food activism for you, then.

As I've been working to dramatically decrease the number of canned products I buy (if I can't get a BPA-free can), I realized I would have to find a substitute for one of my staple foods - canned refried beans. I'm rather famous in my family for my love of beans (c'mon, they are like the perfect food - filled with protein and fiber and deliciousness). There are a couple of companies, like Eden Organics, that make plain canned beans that are both readily available in many regular grocery stores and come in BPA-free cans. However, it's much harder to find the refried beans in my local groceries.

Luckily, I've discovered that making refried beans is incredibly easy and they taste 1000 times better if you make them at home. It really doesn't even seem like the same food. Just goes to show that most of the food we buy is processed to the point that we don't even know how the real thing tastes.

Before the recipe, a couple of notes:

  • Traditionally, refried beans are made with lard or bacon fat or some other animal fat. Because I don't eat red meat, I use butter in the recipe. It's extremely tasty, but if you are a carnivore and you want something more authentic you could substitute fat from an animal, I suppose.
  • You need cooked pinto or black beans for the recipe. I usually cook them in my slow cooker and then save 2-cup portions in my freezer, along with the liquid from the slow cooker. You can use canned beans, but of course, you want to be sure that you find one that says, "this can was made with a liner that does not include BPA," or something similar. 
  • I usually make my beans in the slow cooker with onion, garlic, and cumin. If I do, I reduce the amounts in the recipe below. The recipe below is written as if you're using plain beans.
Homemade Refried Beans

Ingredients:
  • Cooked pinto or black beans with the liquid. For each cup of beans you use, you'll need:
    • 1 tbsp. butter
    • quarter of an onion, chopped
    • 1-2 garlic cloves, crushed
    • 1/2 tsp. salt (I like less salt than many Americans, so you could use a little more if it's not flavorful enough for you)
    • 1/2 tsp. cumin
    • 1/4-1/2 tsp. cayenne pepper
Step 1: Place the butter in a saucepan over medium heat. When it's just about melted, throw in the onion and garlic. Saute for 2-3 minutes.

Step 2: Add the beans and the spices. Bring to a simmer. Lower the heat and simmer uncovered, stirring occasionally, for 20-30 minutes or until the liquid is mostly reduced.

Step 3: Take the beans off the heat and mash with a potato masher until they are the consistency you want - I like mine to be chunky.

Step 4: Let sit for 5-10 minutes to thicken.

You can then use these in tacos or burritos, or as a side dish. Yum!

Sunday, March 3, 2013

Recipe: Tomato Sauce with Sausage and Spinach

For most of my life, I've had a complex. Call it Sauce-ophobia. I've always thought the idea of making sauces to be a super-human cooking feat. This may be because my dad, who was the cook in our family, quested for years to make the perfect spaghetti sauce. Or it may be because people on Top Chef say things like, "my sauce broke! I'm going to be on the bottom for sure!"

And then came Tomato Sauce with Onion and Butter. This sauce, one of the first Smitten Kitchen recipes I ever tried, literally has three ingredients (tomatoes, onion, and butter). Foodie friends swear by this recipe. It's so simple, a child (not a metaphorical child, but a literal child) could make it.

I've used the techniques I learned from that recipe to overcome my fear of sauces. This one, Tomato Sauce with Sausage and Spinach, is my favorite.

A couple of notes:

  • I like to use Applegate Organics Chicken and Turkey Andouille Sausage. I don't eat red meat or pork, and this is one of the few sausages that doesn't have a pork casing. It's also incredibly tasty. You could use any andouille or Italian sausage in the recipe. If you're vegetarian, you could use a veggie Italian sausage like Field Roast. If your sausage is uncooked, sear it in a little oil (you don't have to cook through) before you get started. Then put it on a plate, and when it's cool enough, slice it diagonally. This will allow the slices to hold together. I've also used ground turkey sausage in the sauce, but I prefer links.
  • I serve this sauce with papardelle, a wide, flat Italian pasta - it looks like ribbons. You can choose any pasta, but I like papardelle because the large surface area collects a lot of the delicious sauce. However, papardelle can be hard to find. If you have Whole Foods in your town, they have it there. For Texas residents, Spec's superstores have a much cheaper option. If you don't have a gourmet market, though, you might try orechiette pasta or fettuccine. 
  • If you want, you can add chopped mushrooms or bell pepper at the same time you add onion in the recipe below.
  • This recipe takes at least an hour of cooking time - most of that is inactive, though, so you can go watch a couple of episodes of The Mindy Project while it's cooking.
Papardelle
Tomato Sauce with Sausage and Spinach

Ingredients:
1/2 stick butter (4 tbsp)
4 cloves of garlic, minced
1/2 - 1 yellow onion, coarsley chopped
28 oz. stewed tomatoes (choose a BPA-free can) or 3-4 cups if you make your own. Drain most, but not all, of the liquid.
salt 
pepper
oregano
bay leaf
1-2 c. chopped fresh spinach
4-5 links andouille or Italian sausage (chicken, turkey, or vegetarian)
2 capfuls of balsamic vinegar
8 oz. of papardelle or orther pasta, cooked

For garnish:
fresh parsley
shaved parmesan

Step 1: Place butter in a large saucepan over medium to medium-high heat. When the butter is about half melted, add the onion and garlic. Cook, stirring occasionally, until the onion is translucent. You should still have a lump of solid butter in the pan.
Step 2: Add the tomatoes. Season with salt, pepper, and oregano to taste (about a teaspoon of salt and oregano, and 1/2 teaspoon of pepper, if you're into measuring). Add a bay leaf. Bring to a boil. Lower heat, and simmer for about 40 minutes, occasionally stirring and crushing the tomatoes up against the walls of the pot.
Step 3: Add the spinach and sausage. Simmer for at least 20 more minutes, but you can simmer for as long as 40 minutes.
Step 4: Add the balsamic.Stir.
Step 5: Stir the pasta into the sauce. Serve in bowls with a garnish of parsley and shaved parm.

Buon appetito!

Wednesday, February 20, 2013

Recipe: Slow Cooker Stewed Tomatoes


As I mentioned a couple of days ago, I've been experimenting with giving up canned foods. I couldn't imagine giving up canned foods without having a replacement for canned, stewed tomatoes. I almost never buy pre-made sauces, so I've made my own red sauces with canned tomatoes.

With a slow cooker, however, it's easy (but messy!) to make your own stewed tomatoes. They can be frozen and used whenever you need them.

Ingredients:
9-12 ripe tomatoes
1/2-1 yellow onion, chopped
2-4 cloves garlic, crushed or minced
oregano
salt 
pepper
bay leaf

Step 1: Prepare your space. You'll need a big pot, a small bowl for trash (skins, tomato innards, stems), a large bowl of ice water, and a bowl for your tomatoes. You'll also need a cutting board and knife. I'm not going to lie, the first time I tried this, I made a huge mess. But don't give up! The second time, I was able to keep the mess contained. Have your slow cooker ready (mine is 3.5 quarts).

Step 2: Blanch (or quickly boil) the tomatoes. Fill a large pot 2/3 with water, and get it boiling. Then -- carefully, so you don't burn yourself -- pour in the tomatoes. Leave them in the water for 2-3 minutes, or until the skins begin to split.


Step 3: Using a slotted spoon, transfer the tomatoes to the bowl of ice water. Wait a couple of minutes, until they are cool enough to touch.


Step 4: Peel and core the tomatoes. You should be able to simply pinch the peels and they'll come off. Discard the peels. Scoop out the tomato innards (seeds and liquid - if you don't, your stewed tomatoes will be too watery.) Chop the tomatoes if you want diced tomatoes; leave them whole if you want whole tomatoes ... I know, crazy, right?

 Step 5: Place the onions, garlic, and tomatoes in the slow cooker. I don't usually measure my spices, but you want about a tablespoon of oregano, a teaspoon or less of salt, and a half teaspoon of pepper. Throw in the bay leaf. 

Turn your slow cooker on low for 7-8 hours.

That's it! The tomatoes can be used just like any canned tomatoes. Freeze them in 2 cup portions and thaw when you're ready.

Saturday, December 22, 2012

Russian Tea Cakes, Pan de Polvo, Butterballs ... whatever you call them, they're delicious

As a teacher on Houston's east side, working in a community largely made up of second- and third-generation Mexican-Americans, I was lucky enough to experience the overwhelming  generosity of the neighborhood - especially around the holidays. My students and their families didn't have a lot of money, but each Christmas, I was showered with gifts and goodies. One of my favorite Christmas traditions was receiving cookies called  pan de polvo, which literally translates as "bread of dust." These nutty shortbread cookies, made with pecans and rolled in cinnamon and sugar, are traditionally served at Christmas and weddings, and at other events such as baby showers. I never could resist the delicious, buttery goodness.

Many of us of European heritage may be familiar with pan de polvo by another name - Russian tea cakes. These cookies are nearly the same, but Russian tea cakes are made with almonds instead of pecans, and rolled in powdered sugar instead of cinnamon sugar.

No matter what you call them, however, these cookies simply taste like Christmas - and they are easy to make. 

Ground pecans - if they get too sticky, just use a fork
to separate the granules.
The recipe below is one that has been passed down from my Russian great-grandmother. I've included instructions for both pan de polvo and Russian tea cakes. 

The recipes below call for ground nuts - they can be ground in a food processor or food mill. The nuts should be ground to a fine consistency - almost like corn meal. The pieces will be somewhat sticky due to the oil content of the nuts - you can use a fork to break up any large lumps.

These also call for sifted flour. Sifting flour aerates it, which means that one cup of sifted flour actually contains less flour than a cup of unsifted flour. When I was a little girl, I loved playing with the flour sifter. However, many of us don't have a flour sifter any more. So what to do? Just pour the flour into a bowl, and fluff it with a fork for a minute or two - it should become fluffier and more airy as you do so. Then measure the flour again, using a knife to level off the measuring cup. Don't pack the flour into the cup - remember, you want light and airy.


Pan de Polvo or Russian Tea Cakes

Ingredients: 
1 c. butter
1/2 c. powdered sugar
2 c. sifted flour
1 c. ground pecans (for pan de polvo) or ground almonds (for Russian tea cakes)
1 tsp. vanilla extract
Cinnamon/sugar (about 2 tsp cinnamon to 1/4 c. granulated sugar for pan de polvo) or powdered sugar (for Russian tea cakes) for the outside of the cookies

Step 1: Preheat oven to 325 degrees.

Step 2: Using a hand mixer, cream together the butter and powdered sugar. This will be granular at first. Keep mixing until it becomes creamy and smooth.

Step 3: Mix in the flour, nuts, and vanilla. Again, this will form small grains, which will become bigger as you mix. Keep mixing until the dough becomes smooth. (Added bonus: because this dough contains no eggs, you won't risk salmonella if you eat it raw!)

Step 4: Line a cookie sheet with wax paper or parchment. Form 1 rounded teaspoon of dough into a ball for each cookie, and put them on the cookie sheet, about 1 inch apart.

Step 5: Bake for 30-35 minutes. Don't let them get too brown on the bottom.

Step 6: Whichever sugar you are using, put this onto a plate. Don't be skimpy. While the cookies are still warm, roll them in the sugar, then put them on a wire rack to cool.