Pages

Showing posts with label food. Show all posts

Sunday, June 28, 2015

Becoming a Meal Prep Master


Do you know those people who show up to the lunchroom at work and always have something that looks and smells delicious? Something that, when they microwave it, fills the kitchen with enticing aromas?

Have you ever wondered how you can become one of those people? How they find the time?

The answer: meal planning and prep.

I used to bring a Lean Cuisine meal to work EVERY DAY. When I got home, I would eat something like scrambled eggs, grilled cheese, or a quesadilla. I didn't really like vegetables or know how to prepare them.  

When I read Michael Pollan's In Defense of Food, however, I radically changed almost everything about my diet. I stopped eating most highly-processed foods (anything with ingredients I couldn't pronounce or weren't food) and upped my calories from plant foods. 

The truth is, however, this type of eating takes a lot more planning than the old way. Whether you're interested in meal prepping to save time, money, the environment, or your health, here are a few of the ways that I've found to make meal planning and prepping easier.


Get to know yourself as a cook.
If you've never done much cooking, that doesn't mean you can't change the way you eat to include more home-cooked foods. It just means you might need to experiment for awhile. Some people don't really like cooking, and so they'd rather sacrifice one whole day a week (or a month, if they are really organized!) to cooking. I love cooking and so I don't mind doing some cooking mid-week. I also like to buy a lot of fresh produce or use things from the garden, so that means that I go shopping every week (usually twice - one "big shopping" on Sunday, and one mid-week). Think about how much time you want to spend shopping and cooking. If you have a partner or roommate who likes chores that you don't, you might be able to trade some of them for food. I once had a roommate who did all the cleaning if I did all the shopping and cooking for both of us - perfect arrangement.

I use this meal planning pad from
Knock Knock for my planning
(then I use the back of last week's
 sheet for a shopping list).
Start with a plan.
Every Sunday, I sit down with my week's calendar and grab a few cookbooks, plus my Kindle so I can Pinterest. I plan breakfast, lunch, and dinner for every day, plus two snacks.

I'm one of those people who doesn't mind repeating foods I like, so I'll usually have the same thing for breakfast for a whole week (lately I've been digging a variation on these goat cheese, turkey and egg cups), and I have a routine for snacks: green smoothie in the morning, a piece of fruit and some almonds or a homemade granola bar for afternoon snack. I make the green smoothies each morning, because I don't like them more than a day old. However, I prep all of the fruits and veggies on Sundays, cutting them up and freezing them.

For lunch, I have three go-tos:
1. Mason jar salads (or other types of salad, like this bulgur blueberry mint salad I ate three days last week). Mason jar salads are great for prepping on the weekend and then popping in your lunch box, because they don't get soggy.  This article tells you the basics of how to prep them, and there are a bazillion variations on Pinterest. 
2. Homemade soups, stews, or chilis: These are more of a winter fave, when I want something warm. I usually cook these on Sunday, then portion out into individual containers for the week.
3. Dinner leftovers: I often cook one dinner on Sunday, eat it for dinner Sunday, Monday, and Tuesday, then have the leftovers for lunch on Wednesday and cook a new dinner Wednesday night.

If you're planning for kids, Kristin Howerton has awesome ideas for how you can set up a situation for them to make their own lunches. My friends who have smaller kids who can't yet make their own foods, put on their plans lines for their own lunches and snacks, and those for their kiddos. More detailed planning templates for whole families can be found a quick Google away.

On your plan, jot down any notes that are going to impact your time during the week. For example: last week I was planning to make chicken on Thursday night, but I had a work event in the early evening and knew I wouldn't have any energy when I got home. I put on my plan that I needed to make the marinade on Wednesday night, then put the chicken in the marinade before I went to work in the morning Thursday. When I got home, I just had to dump the chicken into the pan and bake it.

Shop smart:
Once you have a plan for all of your meals, go through your plan and write out your shopping list. Then here's the trick: only buy stuff on the list. I can't tell you the number of times I wanted to eat something bad for me, but couldn't because there was nothing in the house. If you need to, you might want to make some rules for yourself -- I tend to live by Pollan's food rules: Eat food, not too much, mostly plants.


For me, the hardest part is not shopping on the weekend, it's the desire for bad stuff during the week when I'm driving around for work. Diet Coke, get thee behind me!! This is the main reason I always have my snacks planned out, so I try not to be hungry.

Invest in the right tools:
If you're going to meal prep, you can't get around the fact that you need A LOT of containers. Some of my favorites:

Mason jars: They're not just for hipsters! Mason jars are excellent for salads, as I noted above, and for smoothies, soups, or anything somewhat liquidy. The lids go on super-tight, so they aren't easy to spill.
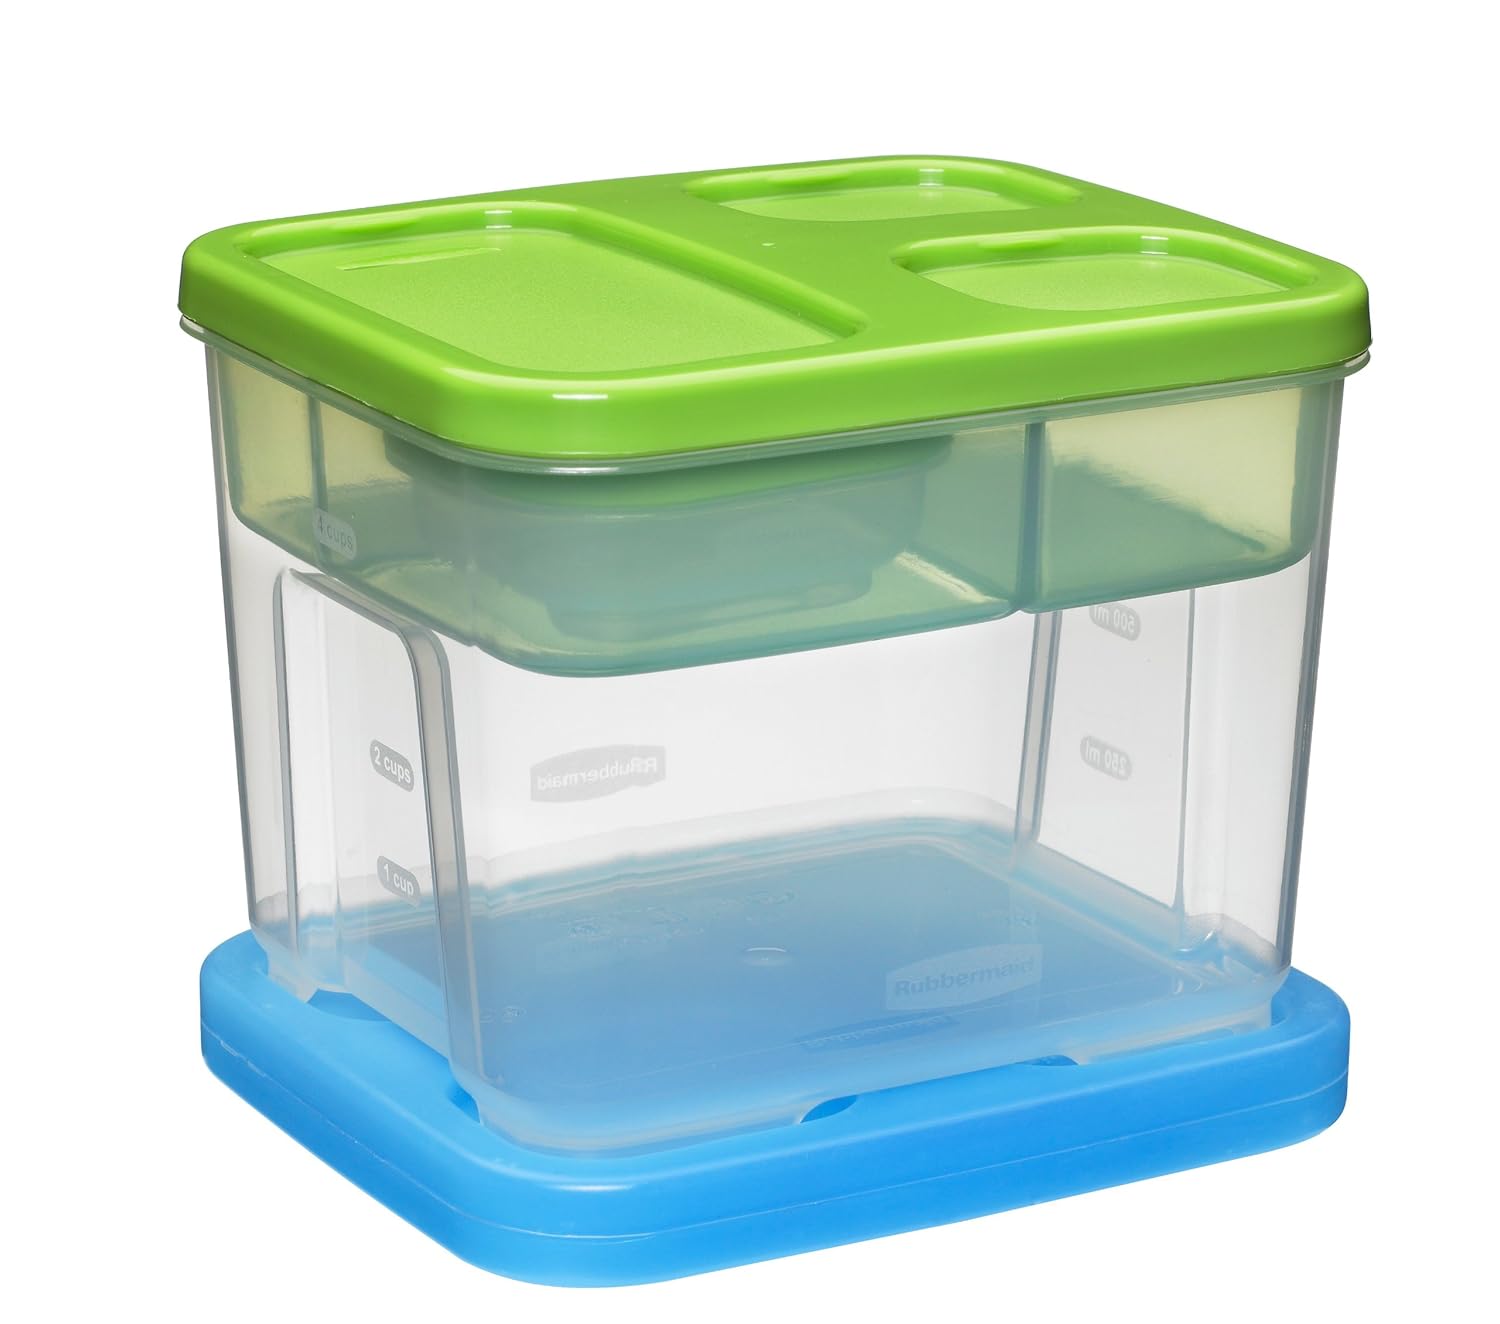
Lunch Blox:  I prefer glass containers for foods that I'm going to heat up, but for salads and snacks, Rubbermaid Lunch Blox are awesome. I have a couple of the salad Blox, and they are also great for what I call "snack bento": you can put a bunch of different small snack items, like some tomatoes, carrot sticks, a few Nut Thins, and some hummus all together, and they don't mix with each other because of the divisions in the Blox.
Small containers and spice jars: It's good to have lots of tiny containers -- I use these more than any others, because they help you keep a handle on portions. When you use up a spice, save the jar (wash it thoroughly or the spice flavor will linger), and it can be added as another small container.
Gallon zip bags: While I try not to use many items that aren't reusable, gallon zipper bags are the best for freezing fruit, soups, cooked grains, etc. This is because they can be stacked flat in the freezer, saving space. Depending upon what was inside them, they can be washed and reused before recycling.

Use the whole kitchen.
If you're one of those people who doesn't want to cook more than once a week, make use of the entire kitchen. When you plan, make sure you have one thing you can cook on the stovetop, one for the crockpot, one for the oven, and maybe one for the grill or toaster oven (I cook whole meals in the toaster oven, especially in the summer when I don't want to turn on the real oven). This is especially helpful when you're planning not just for one or two people, but a whole family, where you'll need multiple dinner entrees.

Meal planning and prep can be a shift in thinking about eating, which many of us tend to do on the fly, or turn to convenience foods. However, it also makes life more delicious -- I like to turn up the music when I'm cooking, and it's always wonderful to wake up in the morning knowing that I don't have to think about what to pack in my lunch kit.

Do you have any great tips for meal prepping?


Tuesday, May 12, 2015

Part of Your Wholesome Breakfast

Remember when this was the iconic "healthy" breakfast?
Photo: thefeedingdoctor.com
Breakfast. 

The most important meal of the day, they always say.


For me, it's also the most challenging meal of the day. I'm one of those folks up who wakes up feeling both hungry and like I don't want to eat. 


And of all the meals, breakfast seems to be the one that's been most colonized by the food-industrial complex (unless you count public school lunches -- but that's a whole other post).


Breakfast food aisle. Healthy?
Photo: lifeintheusa.com


Pop-tarts, cereal, cereal bars, yogurt in squeezable tubes, pre-made egg sandwiches... it's all incredibly processed. Whenever I walk down the center aisles of the grocery store. which I do only to buy select items on my list, I'm astounded by the variety of foodstuffs available to start your day that are basically just sugar and chemicals (and expensive!)


But I get that it is much more convenient to pop a waffle in the toaster than to actually make something -- and I'm definitely the type of person who likes to sleep in until the last possible second. 


I've developed a list of foods that I know will make a satisfying breakfast, that I will actually want to eat, and which are convenient and quick to prepare. Usually I go through phases where I'll eat one of these things every day until I get tired of it, then switch to something else on the list.


Avocado and Hummus Toast

I guess avocado toast is a thing now? I mean, I've seen it on the menu at actual restaurants, which is a little odd because it involves just smashing avocado onto toast. I usually use a slice of Ezekiel toast, mash a quarter of an avocado on it, add hummus, and then sprinkle with black pepper. Healthy fats, fiber, and protein - what more could you want?

Chia "Donuts"

Chia donuts with some mini-chocolate chips. Recipe to come!
These are my latest go-to breakfast. I discovered the recipe in my trusty Oh She Glows cookbook; they are vegan and gluten-free, made with homemade oat flour and chia seeds to fill you up. In the book, they are made with a lemon coconut cream glaze, but I skip this, and instead toast them and put a little peanut butter on them. I also substitute raw millet for half the chia seeds, because I like the crunch of the millet. I'll make a batch on Sundays, and then keep them refrigerated for the rest of the week.

I call them "donuts" in quotation marks, because, even though they are cooked in a doughnut pan, they aren't really something that a kid would crave. However, I've adapted the recipe to be more kid-friendly, and I'll be sharing the recipe for Cocoa Protein Power Donuts later this week!


Another benefit of making your own egg sandwich -
perfectly runny yolks.
Egg sandwiches
For years, egg sandwiches were a staple of my diet. I eat them less often now, as I've cut back on both dairy and eggs. However, they will always be a favorite. I prefer to make my own, rather than buying frozen, because I can choose eggs and meat that are free(er) of bad stuff. I like to use Applegate Farms turkey sausage.

How to cook your own egg patty? Crack an egg into a mug, then scramble it with a fork. Microwave for 38-40 seconds. Then flip the egg over in the mug, and microwave for another 30 seconds. Use a fork to get the egg out -- you'll have a round patty just the right size for an English muffin.


Overnight Oats

I've shared recipes for overnight oats before, but if you haven't tried them, I definitely recommend them. These are a great make-ahead, take-to-work breakfast, and the internet teems with recipes for chilled oatmeal, so no matter your flavor preference, you'll find something to suit it.

Good Food Made Simple Breakfast Burritos

Despite wanting to start the day with something I've cooked myself, there are days when I just can't make it happen. Particularly when I know I'm going to be gone for most of the day on the weekend, I like to pick up some of these breakfast burritos that I can nuke and eat quickly or take in the car. I've tried lots of different burritos in the natural foods frozen section, and many of them sacrifice taste to the health gods. I've found my favorite in the Good Food Made Simple brand. They are free from chemical preservatives, artificial flavors, sugar substitutes, etc. 


Breakfast in Spain - traditional Sevillana breakfast.
Now that's how we should do breakfast!


Sunday, September 7, 2014

Recipe: Overnight Oats, 2 Ways


I think I've mentioned before, I'm a super-cool urban hipster who is always up on the latest trends.

Oh, wait, what was that? You're snickering at me?

OK, fine. If you don't believe me, check out this lunch I recently packed for myself:

Why, yes, that IS a green smoothie in my lunch.

See, that's THREE Mason jars in one lunch. Other hipsters tip their waxed moustaches at me (yes, I spelled it the French way!) when they see that.

One trend that I've been enjoying recently is the rise of overnight oats. This is oatmeal that you don't have to cook; it's vegan-friendly (I'm not a vegan or even a vegetarian, but sometimes I play one on TV) and it tastes delicious ... if you are someone who likes things that are the consistency of rice pudding. I say this, because there's a large segment of the population that doesn't like pudding-type things with chunky bits. However, if you LOVE rice pudding or other types of chunky pudding (tapioca, bread), then you will like this a lot.

There are a lot of overnight oats recipes out there, from simple to complex. The basic principles are these: You put 1 part oats to 1 part liquid (I like almond milk) and an optional 1/3 part chia seeds in a container and put it in the fridge overnight. The oats and chia seeds soak up the liquid, and become a kind of pudding.

PUDDING FOR BREAKFAST!! And it's pudding that's ready the moment you wake up!

Make it in a funky jar for extra street cred -
if the street is in Portland and is lined with artisan barrel makers
and food trucks selling Korean-Finnish fusion food (kimchi herring - yum!). 

In experimenting with overnight oats, I've come up with two variations that are my favorites. 

The first is Cherry Vanilla Almond. I am a huge fan of dried cherries, particularly of the sour variety.

The second variation I've dubbed "Funky Monkey." The first time I ever had a smoothie, it was at a little shop in Santa Barbara, and the drink I had was called the Funky Monkey - peanut butter, chocolate, and banana (hence the monkey).  I've named my concoction after this perfect combination of elements.

Here are the easy-peasy recipes.

Cherry Vanilla Almond Overnight Oats

Ingredients (per serving)

1/3 cup rolled or steel-cut oats (steel-cut make a chewier texture)
1/3 cup vanilla almond milk
about 1/8 cup chia seeds
1/3-1/2 banana, mashed (optional)
a dash of cinnamon
a handful of dried sour cherries

Mix all the ingredients in a container (or Mason jar!), making sure to incorporate the banana well. Cover and put in the refrigerator overnight.

When you take it out of the refrigerator, it will look pretty firm and the chia seeds may be resting on top. Add a splash of the almond milk and stir. Garnish with your favorite fresh berries or sliced almonds (blueberries are especially delicious).

Funky Monkey Overnight Oats

Ingredients (per serving)

1-2 tablespoons peanut butter (I find 1.5 to be the sweet spot)
1 tablespoon cocoa powder
1/3-1/2 banana, mashed
1/3 cup vanilla almond milk
1/3 cup rolled or steel-cut oats
1/8ish cup chia seeds
a squirt of honey or other sweetener, if you want (I don't like very sweet things, so I often omit this, but the pudding isn't very sweet without it - especially if you're making this for a kid, I would add it, at least until you have them hooked)

Whisk together the peanut butter, cocoa, banana, and almond milk until well incorporated. Then mix in the other ingredients. Cover and refrigerate overnight. Splash with almond milk and stir to serve. 

Thursday, March 20, 2014

Recipe: Shamrock Shimmy Smoothie

Mid-morning snack attack at work!
Shamrock shimmy smoothie!
Anyone who knows me, knows that I'm always ahead of the trends.

Exhibit A: Before most people had heard of Nirvana, I had already decided I didn't like them. Billy Joel, people. That's where it's at.


Exhibit B: Prior to "boho chic" being a major trend, I was sporting hippie threads that I dug out of the drama closet at summer camp.

Exhibit C: Prior to knitting becoming a trend, I taught myself knitting from a kit called "I Taught Myself Knitting!"

(Hmm... I'm beginning to realize I may not be as cool as I thought...)

One trend that I just haven't been able to get behind, though, is KALE. Seriously. Why would I want a salad that's made out of wadded up paper towels? My nightmare is being forced to eat a kale quinoa salad at a pop-up restaurant while watching Girls and listening to EDM. I imagine that in ten years, people are going to wake up and be all: why did I eat that? And why did we think that stuff was cool?

Even more baffling to me: putting KALE in a smoothie. A smoothie is supposed to be a bait-and-switch so that you can drink milkshakes and feel healthy about it. Peanut butter, banana, Hershey's. That's a smoothie.

Do you sense that I'm about to eat my words?

I still don't want a kale salad or a big plate of kale or a kale cupcake. My mom got me the Oh She Glows cookbook for my birthday, though, and it has several recipes for green smoothies in it.  Oh She Glows is a blog of vegan, whole foods recipes (when you Google it, the first search that comes up is "Oh She Glows kale salad"). The blog and the cookbook are great because lot of vegan recipes are heavy on soy products and processed fake-meat-like foods, which I try to avoid, particularly because it's the "Year of More" and that means more whole foods

For some reason, I thought I'd give green smoothies a try after every blogger in the world had already decided they were God's gifts to moms who give their kids cute nicknames on the internet. Guess what? 

Reader, I loved it.

So let's come around to the recipe, shall we?

A few days after this revelation, I was cruising on that great recipe-box-in-the-cloud, Pinterest, and there was a recipe for "healthy Shamrock shake - with mint!" I have never had a Shamrock shake, but that sounded pretty good.

For some reason, I pictured "mint" as being, you know ... mint. Like leaves, and stuff. I always forget that a lot of people don't eat natural things. The recipe was made with milk (I'm cutting way back on dairy), chocolate chips (didn't have those), and peppermint extract. Since I have a bunch of mint growing in my garden, I decided that I could make a "Shamrock" smoothie that would actually be healthy.

Below is the recipe my first stab at making my own green smoothie. I think it is SO delicious. At least to me, and I'm the one drinking it. 

A few notes:

  • I've made it with both baby kale and baby spinach, but if you're making it for kids and you want them to forget there are greens involved, I'd go with the spinach.
  • I used honey in this recipe, but if you want it to be completely vegan, then substitute a plant-based sweetener.
  • This is not a cute color.
Shamrock Shimmy Smoothie

Ingredients
1 c. non-dairy milk (I like hemp milk)
3/4-1 c. baby kale or baby spinach, de-stemmed and torn
1 banana, sliced and frozen
6-10 fresh mint leaves
1 tbsp. unsweetened cocoa powder
2 tsp. honey

Step 1) put everything in a blender and blend it and drink it. 


Thursday, January 30, 2014

Recipe: Thai-inspired Coconut Curry Soup

The soup at the end of the story.
Tuesday, I hopped on a plane with seven co-workers, heading to Birmingham, AL for a conference. As we began our descent into Bham, the pilot announced that the airport was closed due to ice and snow. We would be able to land as soon as they cleared the runways.

We were diverted to Nashville, where we spent the day waiting for updates about those runways. As we sat in the airport, much of the South was plunged into a state of emergency, with people abandoning their cars on the side of the road, kids sheltering at school overnight, and people sleeping in Publix. Houston's strategy under even a threat of ice is to close the schools and a lot of businesses pre-emptively, People make fun of us for it, but as a Northerner who now lives in Texas, even a wee bit of ice is no joke in the South. There are no plows, no sand trucks, no studded tires. It's best to keep as many people off the roads as possible. The fact that some cities didn't is partly why there was such a problem on Tuesday.
Here we are - we made it home!
(That's me, second from right)


We were pretty lucky in that we were safe and warm in the airport, and by evening our flight was finally canceled. Nashville was chilly but there was no severe ice or snow, and the airline gave us a discount on a hotel. With Birmingham airport remaining closed, we turned around and headed home.

What does this have to do with food? you might ask.
I'm like Ponyo when I see a bowl of noodles.


Well, two days in an airport leaves one feeling kind of funky. On the way home, I began thinking about what I could cook up that would be warm, comforting, and healthful. Of course, I landed on the idea of chicken soup... but not just any chicken soup. Since making chicken pho from Smitten Kitchen last week, I'm sort of obsessed with warm, slurpy bowls of noodly goodness (well, truth be told, I'm always kind of obsessed with this, as any fan of Miyazaki should be).

I learned some new techniques from the chicken pho - namely, how to make a good chicken broth - so I decided to use those to make tom ka gai, which is a Thai version of chicken soup. On the way home, from the airport I stopped at the store for ingredients, and by that evening I was slurping away.

Tom Ka Gai (Coconut Curry Soup)

For the broth:

3 1" x 1/2" pieces of ginger, peeled
2 Thai chilies, halved and seeded
1 lime, quartered
1 onion, peeled and quartered
4-6 bone in, skin on chicken thighs or drumsticks

Add all ingredients to a soup pot and add 6 cups of water, or just enough to cover. Bring to a boil, and lower heat to simmer. Simmer 30 minutes or until chicken is cooked through. Remove chicken from the pot. 


Remove the chicken meat from the bone and set aside. Return the bones and skin to the pot and continue simmering for 20-30 minutes.

Remove the broth from heat, and strain, discarding all the solids.

While the broth is simmering, prep:

1 red pepper, sliced thin
1 shallot, sliced thin
1 package of dried wild mushrooms. Pour boiling water over them to cover and let sit for 20 minutes, then slice thin (you could also use sliced fresh mushrooms)
1 package of thick rice noodles (pad thai noodles or rice sticks) - prepare according package directions

To finish the soup:

Return the broth to heat, and whisk in:

2 cans of coconut milk or lite coconut milk
3 tbsp. Thai red curry paste
1 tbsp fish sauce (if you can't find fish sauce, add a tsp. of salt)
a squeeze of Sriracha (Thai hot sauce - optional)
1 tbsp. brown sugar
the juice of 1-2 limes
pinch of black pepper

Let simmer for 5-10 minutes.

Add the chicken, red pepper, mushrooms, and shallots and continue to simmer until the chicken and veg are heated through.


To serve:

Put some of the noodles in a deep bowl, and ladle the soup over them. To garnish, add chopped cilantro, basil, scallions, and a wedge or two of lime.

Note:
If you have left overs, refrigerate the noodles and the soup separately so the noodles don't break down in the liquid. The coconut milk may separate somewhat in the fridge, but just heat it up and give it a stir!


Sunday, January 12, 2014

Water, water everywhere...

... and not a drop to drink.

At least, that's the case in West Virginia, where a chemical spill has contaminated the water supply for nine counties. Like something out of the environmental thriller The East (watch it, if you haven't - most people haven't), the spill will cause massive costs for all of us who pay taxes, since FEMA has been called in to deal with the disaster.

This is especially shameful because safe drinking water is one of the huge achievements of our nation. When clean water gushes out of our taps day-in and day-out, we forget that this is a friggin' miracle. For much of human history, and in many parts of the world today, water-borne illnesses are a huge cause of lost wages and school time, disability and death. More children around the world die from diarrhea caused by unsafe water than from AIDS and malaria combined. Ever hear someone say, "Yeah, I just had cholera last week"? Neither have I - because we don't have to worry about cholera. We also don't have to spend half the day walking to get water to lug home. 


What's happened in West Virginia is incredibly rare in the U.S., and we shouldn't let it scare us off tap water (and we should also ensure that the company, Freedom Industries, has to pay so that these kinds of spills don't become more common).

 I admit, I get a little hot when people say, "I don't drink tap water." 

First off, if you drink bottled water, you probably do drink tap water. The NRDC estimates that 25% of bottled water is actually tap water, and sometimes it's not even filtered additionally. Those companies then profit from our public utilities - the utilities and EPA make sure the water is safe, and the companies who sell the water don't have to worry about it. 

Of course, bottled water contributes significantly to the amount of plastic in landfills, and the plastic itself can leach into the water. 

While almost all drinking water in the U.S. is extremely safe for almost all people (some with compromised immune systems shouldn't drink it), if you are worried:

  • your utility is required to provide an annual safety report. Just call them up and they must send you one.
  • use a filter. This is also helpful for those who don't drink tap water because of taste.
I've been drinking tap water since I was a kid, and I just fill up my trusty ol' glass Voss water bottle (it's about $2 and then you have a heavy-duty glass water bottle that lasts and lasts).  I've even been known to drink from drinking fountains in public parks and drink water out of my bathroom sink. Still kickin'.

Wednesday, January 8, 2014

Recipe: Breakfast Brown Rice with Fruit and Nuts

At your work, do you always start meetings with "whip-arounds?" Probably not.

 If you've never heard of a whip-around (I know, the name is vaguely S&M), it's where someone asks a get-to-know-you type question and then the question "whips" around the table, answered by each person in turn. It's kind of like an ice breaker, except everyone knows each other already, so the ice is long since melted. 

Of course, many of this week's whip-arounds have been about New Year's Resolutions. So when I said that eating "more whole foods" was one of my goals, many "who's-on-first?"ish conversations ensued, when folks thought I said I'd eat "at Whole Foods" instead of  "eat whole foods."

(I'm sure that you've by now developed a mental image of the type of workplace I inhabit. Yes, we are a bunch of lovable nerds.)
THIS.......................................................NOT THIS


Anyhoos, one way to incorporate more whole foods is by bringing them into breakfast. I've never been a fan of brown rice, but cooked with spices, it makes a great hot breakfast cereal.

You can cook the rice on the weekend, refrigerate it, and then serve it up throughout the week.

Many people say they "can't" cook rice, so the idea of cooking up a pot and banking your future breakfasts on it might feel a little daunting.  A few tips:

  • I always set a timer for a few minutes less than recommended. 
  • When you put the pot lid on, very slowly bring the stove top temperature down to low. If you do it too quickly, the water can stop simmering.
  • When the timer goes off, slowly lift the lid of the pot, and see - does the rice have a flat surface with several holes in it? If yes, push some of the rice to the side and see if there is water on the bottom of the pot, underneath the rice. If there is, it's not done. Give it a few more minutes. Keep an eye on it so it doesn't burn.
  •  If some rice burns and sticks to the bottom, don't try to scrape it up and serve it. Just let it die. Gently fluff the rice on top with a fork so you don't get the burned pieces.
I usually get nice fluffy rice when I follow these tips.

Breakfast Brown Rice

Ingredients for the brown rice:
2 tsp. olive oil
1 c. brown rice
1 tsp. cinnamon
1/2 tsp. cardamom or nutmeg
1/4 tsp. ground cloves
2 c. water

To serve:
1/3 c. vanilla soy, hemp, or almond milk or 1/3 c. skim milk
your favorite dried fruits or berries (like apricots, cherries, raisins, or blueberries)
slivered toasted almonds or other nuts that you like

To make rice:
Heat the oil in a pot over medium-high heat. Pour in the rice, and the spices, and stir. Cook, stirring, until the grains begin to become opaque and the spices are fragrant - 2-3 minutes. Pour in the water and stir once or twice. Heat water until boiling, then put the lid on the pot and gently lower temperature. Cook for 38-40 minutes before checking for doneness.

If you're not serving right away, refrigerate rice.

To serve:
Put about 2/3 c. of the cooked rice into a bowl and pour in the milk or milk-like beverage. Add the dried fruits. If the rice is coming out of the fridge, microwave for about 1 min. 30 sec. Sprinkle on the nuts after heating.

Sunday, September 22, 2013

Sunday Routine

 Or ... in which you might hate me a little bit.

At work, as I'm microwaving my lunch, people often say something like, "That smells great! Did you make that?" (Unless it's fish, in which case they politely hold their noses and wish they weren't seated next to the microwave.) "You're so good about making your lunches."

I go to work each day with a lunch kit (that's what we call lunch boxes in Texas) filled with a day's worth of snacks, lunch, and even, sometimes, dinner if I'm going to stay late at work. 

This can make others throw up in their mouths a little bit. I admit it, it's gross when someone seems to have their life so together.

Let's get this out of the way: my life is not that together. Just ask my cat, who would probably appreciate it if I was as scheduled about cleaning his litter box.
This is a slightly excessive plan I created in order
to cook THREE meals at the same time. I know, right?
Barf.

I am an organized person. I'm not crazy about it, OK, but I'm organized. I became moreso when I started attempting to be "light green." If you are going to cut down on processed foods, that means you have to carve out some time to process (a.k.a. cook) the food yourself.

Therefore I've developed a routine for most Sundays so that I can prepare  for the week ahead. Here's how the magic happens:

1. Meal Planning
I dig out my cookbooks, my laptop, and plan out all of my meals for the week. This usually involves planning to cook three times: I cook 1-2 things on Sunday (or one Sunday and one Monday). I alternate these meals for dinner and lunch, and often cook once more mid-week. From this plan, I craft my shopping list.

2. Shopping
So then I buy the food.

I'd like to say I go to the farmer's market or something like that, but when choosing between sleeping in and getting the the farmer's market, the choice is always, always sleep in.


3. Here's where it gets crazy.
So then I unpack all the food and fill up a couple of bowls with vinegar and water, and I wash all the fruit and veg. I spread towels out and lay out all of the produce to dry. Why do I do this? It's not as though washing an apple right before you eat it takes up all that much time.

Well, as a kid I really hated washing the produce whenever I had to make a salad. All of the wet lettuce just felt slimy. In my adult life, I've solved the slime problem for myself by cutting down the washing to only one day a week. Pretty much my whole adult relationship to vegetables is dictated by my childhood hatred of salad.

These are herbed egg, turkey and goat cheese
breakfast cups from the blog Back To Her Roots.
4. Cook it up!
I then cook one or two of my weekly meals, and sometimes bake something for breakfasts. When I make the meal plan, I strategize so that I'll be cooking one meal on the stove top and one in the oven or toaster oven. For mid-week, I like to use the slow cooker. 

5. Pack meals for the week.
Here's where I slowly start to fall apart... oh, you thought I was some organizational genius, did you? Usually, this entire plan begins two or three hours later than I intend it to, usually because I like to read and drink coffee for a long time on Sunday morning. And I think I mentioned, I enjoy sleeping in.

So on Sunday night,  I put together my food, eat my dinner, and then ... there are a lot of great shows on Sunday nights! HBO always has their best stuff on Sundays, plus there's The Good Wife,  and Homeland is starting next week! So then I end up shoving the food in the fridge so I can just lie down on the couch and watch TV.  The next morning, I hit the snooze button way more times than I should, and end up throwing my lunch together at the last minute anyway.

Hmm... maybe I'm not that organized after all...

Sunday, August 4, 2013

Recipe: Seared Scallop and Summer Fruit Salad with Lemon Prosecco Vinaigrette


If you are standing at the fish counter, you might get scared by the price of scallops, especially the gigantic sea scallops. And you might think to yourself: I've heard scallops are easy to ruin. I'm not going to buy something expensive that I will ruin and end up eating drive-thru food because I spoiled dinner.

Good point. But once in awhile, it's good to take a chance. And scallops are actually easy to cook, as long as you pay attention.

They are expensive, however, so I usually only buy them a couple of times a year. When I do, I want to pair them with delicious ingredients that won't overwhelm their delicate flavor. A few years ago, I tried a recipe that paired scallops with watermelon, and since then, I've been hooked on this combination. 

Yesterday, I bought some scallops and watermelon, and came up with this recipe using some things I had in my refrigerator. This salad uses seasonal fruits - I used watermelon and blueberries, but you could use others as well. I wanted to add nectarine, but it wasn't quite ripe. This dish would make a good special occasion meal, because it's pretty, and every bite is different, depending upon what you have on your fork: spicy arugula, tangy goat cheese, sweet berries and melon, zesty basil. 

So... about those scallops. How do you ensure success?        


First,  for this recipe, you want to buy sea scallops. Most scallops are rated either "Best Choice" or "Good Alternative" by Monterey Bay Aquarium's Seafood Watch. This means that you can feel pretty good about most of the ones that you pick up (the only ones that aren't rated good are actually not scallops at all, but skates, which are sometimes cut up and sold as bay scallops). Sea scallops are the big ones; bay scallops are little and are better for recipes where they don't stand alone, such as pastas. Depending upon the size, each person should get 3-5.

Make sure that your "fishmonger" (that guy at the fish counter) gives you fresh scallops - they should be sort of pinkish and smell clean. If you live far from the ocean, lots of people recommend flash frozen scallops instead of fresh.

When you are ready to cook the scallops, rinse them off and pat them dry, then sprinkle on a little salt. Heat some oil or butter in a skillet over high heat. You want the oil to be very hot, smoking a little. Then put the scallops in the pan, without crowding them. Don't move them. Just let them sit for 1 1/2 to 2 minutes. Keep an eye on them, watching the side of the scallop. You'll see that the cooked part turns opaque - turn them over just before that opacity hits the mid-point of the scallop. Then let the other side cook for 1 1/2 to 2 minutes. When you see that only the very mid-point is still translucent, remove from heat and serve right away. The middle might retain some translucency, but remember that the scallop will keep cooking after you take it from the heat. 

If you're nervous, you might want to try with a practice scallop before you sear the whole batch. However, you'll probably find out that it is easier than you think to sear scallops just like in a restaurant.

Recipe: Seared Scallop and Summer Fruit Salad with Lemon Prosecco Vinaigrette

Step One: Salad 
Ingredients per serving:
a handful of baby arugula
3-4 basil leaves, chopped finely
1/4 cucumber, cut into spears
1/4-1/2 watermelon, seeded and cubed into 1 inch pieces
1/4-1/2 cup blueberries or other ripe fruit
1 oz. goat cheese, crumbled

Mix all of the salad ingredients and arrange in the center of the plate.

Step Two: Dressing
Ingredients: (serves 4-6)
Juice of 1 lemon
1 tbsp olive oil
2 tbsp prosecco or other sparkling wine
approx. 1/2 tsp. black pepper
Splash red wine vinegar

Using a fork or whisk, mix the ingredients for the dressing.

Step Three: Scallops
Ingredients: 
3-5 scallops per person, depending on size
sea salt

Following the instructions above, sear the scallops. Arrange them around the salad and drizzle the salad with 1-2 tsps. of dressing. Serve immediately.


Saturday, July 20, 2013

Recipe: Easy Saffron Rice

Saffron threads.
Photo courtesy: Zenz, Wikimedia Commons
There's been so much news going on lately, I've been having trouble processing all of my thoughts. I've started blog posts on serious topics, but haven't gotten through them.

So I thought I would just write something simple, that isn't fraught with conflicting emotions.

A friend asked for my recipe for saffron rice, so I thought I'd share it with all of you. This is a easy side dish, and a nice change from regular rice. It has a mild, somewhat sweet flavor, and is a good accompaniment for chicken or fish. (It's also great with some chopped avocado or tomato)


 Saffron is a spice made from the stigmas of a certain type of crocus, and if you look for it in the store, you might be shocked by the price tag. However, you only use a tiny bit at any given time, so a bottle will last quite a while.

So here it is:

Easy Saffron Rice

Ingredients:
1 tsp. of olive oil or a couple of sprays of olive oil
1/2 yellow onion, chopped
2-3 cloves of garlic, minced or crushed in garlic press
1 c. of rice
5-10 threads of saffron
turmeric
salt
2 c. water or vegetable broth

Step One: In a sauce pan over medium-high heat, heat the oil. Add the onion and garlic and saute until translucent.

Step Two: Add the rice and saute for 1-2 minutes until it begins to be slightly translucent.

Step Three: Add saffron, and a good shake of turmeric and salt. Stir. Then add the liquid and stir. Bring to a boil. Cover and lower heat, and cook according to package directions on rice.

Thursday, June 27, 2013

Waste Not...Freezing Fresh Herbs

After living on the farm for awhile, I've come to realize that I'm not exactly Ms. Green Thumb. I'm also not a black thumb. My thumb is probably more of a chamo brown. 

I have been successful growing herbs, however, and it is nice that I don't have to worry about buying mint or rosemary or basil. When my cilantro bolted (produced flowers, which takes away resources from the leaves, which means that the herbs aren't so nice anymore) I didn't know what to do with all of the extra cilantro, so it went to waste.

When my dill plant bolted, I was ready. I remembered that I had seen an article once on freezing herbs in blocks of ice, and so I did some research and figured out how to preserve herbs. You don't have to be a horticulturist to use this technique - think of all those herbs that come in giant bunches from the grocery store. I was always buying them and then finding it  hard to use the bunch before the herbs turned into a slimy mess. If you follow this method, you can preserve them, saving money, trips to the store, and resources.

Step One: Wash and dry the herbs. This is the dill from my garden. Notice it was a little yellow in places because I harvested it after it bolted, but I just cut those parts out in Step 2.


Step 2: When the herbs are completely dry, chop them to the size you usually use in cooking.

Step 3: Measure the herbs, putting the same amount in each pocket of an ice cube tray, and fill with water. I put a teaspoon in each square. That way, I'll know exactly how much to thaw when I need it. You want to be sure that you put the faucet on just a little when you fill with water. Otherwise the herbs could be splashed from the tray.


Step 4: Freeze, making sure the tray is flat in the freezer.


Step 5: When they are frozen, put them in a freezer bag, squeezing out all the air. Label with the name of the herb and the amount in each cube.

When you're ready to use, just put the appropriate number of cubes in a small bowl to thaw, then squeeze out the water and dry.

Monday, June 17, 2013

Haters Gonna Hate, But Gwyneth Doesn't Care

I know.

I know.

You don't like Gwyneth. You hate Gwyneth.

Lots of people can't stand her. Apparently, it's such a common thing that Buzzfeed recently had a feature of "22 Pictures that may just cause you to like Gwyneth Paltrow again."

If you're one of those people, I think you should change your mind. At least, change your mind about her cooking.

I recently picked up her cookbook It's All Good, and I have to say, it's quickly becoming my favorite kitchen companion.

The theme of the cookbook is simple cooking that is good for you - hence the title. The story behind it is that Gwyneth felt really gross and thought she was going to die one day, but it turned out she was having a migraine and a panic attack. So a doctor basically told her to cut everything fun out of her diet - including deep water fish. Never heard that one before; I guess it has something to do with mercury. Then she found out her family is basically sensitive to gluten and cow's milk and angels and kittens and rainbows (hmm... maybe that is why people don't like her).

All of the recipes in this cookbook are labeled according to the kind of diet you might be on - elimination, vegan, protein-packed, etc. This sounds like it might be a huge bummer, but it totally isn't. So far, everything I've cooked has been full of flavor, filling, and pretty to look at. 

I especially like this book because it is perfect for someone like me, who doesn't eat mammals. There are only a couple of meat recipes; the non-veg recipes are mostly chicken and fish. I've made Gwyneth's Spanish-style barbecue chicken, the roast chicken, and Tandoori turkey kebabs. Every one was delicious.

I will say that most of the cooking times haven't been accurate for me, but I think it's mostly my stove.  Nevertheless, I'd make sure you're using a meat thermometer if you're cooking any of the chicken dishes.

And I'll admit it, I kind of like the pictures of Gwyneth lounging around her farm. I'm pretty sure her life is just like mine... right?